The right side looks like a chain stitch while the reverse looks like an embroidered back stitch and is equally attractive. Try using both in a design by working into both sides as the right side as in the Direction of Travel Shawl
Perfect for using up small scraps of yarn, surface crochet can add colour and fun to plain pieces. It is a very practical way to embellish as it is quickly and easily unpicked as tastes and fashions change.
As well as the more common decorative applications, surface crochet can be practical too. It can be used to join two pieces together by pulling the yarn through two layers held together. Another application is to use it to make a perpendicular join in crochet, working a line of surface crochet then using the chain as if it were a stitch, this technique is often used in crochet slippers and bootees.
But why not just embroider it? While they give a similar look, surface crochet offers two distinct advantages over getting the needle out. Both sides looks neat which isn't the case for either chain stitch or back stitch that this technique mimics. There is no need to break off a length of yarn before you start or pull through long strands to make the stitches and this means fewer ends to weave in – always a plus!
Top tip: If you find it difficult, try using a smaller hook and lighter yarn than the original fabric was made from.
Top tip: You can use water soluble pens (designed for embroidery and dress making) to mark out your design before you begin – just remember to test it somewhere inconspicuous first.
How to:
Step 1: With the yarn held behind the work, inset hook through the fabric from front to back and pull up a loop.
Step 2: Insert hook through the fabric where you would like the top of the next stitch to be and pull up a loop through the fabric and the loop on the hook.
Step 3: Repeat step 2 as many times as desired.
Step 4: To finish off; break the yarn, insert the hook through the fabric where the last stitch was placed and pull the yarn through the fabric and the loop on the hook, pull the yarn tight then weave in the end.
]]>
When we are taught to crochet we are taught to insert our hook through both loops at the top of the stitch but there are other options. And these other options open up a range of different effects.
The front and back loops are relative to how you look at it. So the front loop is always the one closest to you regardless of whether you are looking at the right side or wrong side of the stitch.
The hook is pointing to the front loop of the stitch. If a pattern wants you to work into just this loop you will see the abbreviation FLO – front loop only.
The hook is pointing to the back loop of the stitch. If a pattern wants you to work into just this loop you will see the abbreviation BLO – back loop only.
To work into the back loop simply slide your hook under only that strand of the stitch.
When the stitch is completed it will look like this.
Be very wary when you are working into the wrong side of a half treble stitch as it has a row of horizontal strands that look like the back loop.
This is actually called the third loop and it is possible to work into this – it creates a stitch called camel stitch.
Working in only one loop of the stitch is a great way to create a clean dividing line between colours when you change colours between rows.
the above photo illustrates it nicely with the right hand side of the row being worked through both loops and the left hand side being worked through the back loop only. You can see the left side has a much cleaner line between the colours.
Working stitches into the back loop of every row is often used in crochet garments. At a tight tension it creates an elastic ribbed fabric that has a lot of stretch and some ability to return to its original shape. Worked at a standard or looser tension, using only one loop of the stitch creates a fabric with greater drape as you have slightly loosened the bond betweeen the rows of stitches.
This tutorial was written by Joanne Scrace and originally published in love crochet magazine. It is reproduced with permission.
]]>The corner to corner pattern is worked starting at one point creating the first block and increase a block per row to the widest point then work even for a rectangle or decrease each side for a square, ending with just one block again.
C2C looks horrendously hard written down or charted but is marvellously simple once you have the hang of it (and not a little addictive!) The pattern lends itself well to working in stripes or using yarns with long colour changes. Worked at a slightly looser tension it makes a lovely scarf or cowl.
Stitches are only worked into chains or chain spaces, you'll never work into a treble in this pattern (apart from some possible slip stitching across) making it very suitable for finer yarns orthose with reduced vision.
Changing colour within rows is how you can achieve the popular graphgan blankets (Blankets with a pixelated picture in them. Designs can be charted out on square paper or using cross stitch patterns. Just work a full block in the colour for that square. If working a complex colour pattern it will be useful to wind small balls of each yarn for each section as you would do for intarsia.
How to:
Step 1: Using the colour you want in the corner block, chain 6.
Step 2: Starting in the 4th chain from the hook work three trebles, (one in fourth, one in fifth and one in sixth chains) This makes your first block and the first row. Turn the work over.
Step 3: We now start the next row, (I've joined in in a new colour) by chaining 6.
Step 4: Starting in the 4th chain from the hook make three trebles (one in fourth, one in fifth and one in sixth chains)
Step 5: Slip stitch into the top of the chain from the block below.
Step 6: Chain 3
Step 7: Work 3 trebles around the chain from the block below. Turn the work over.
Step 8: To create a new row (I've used a different colour again to show you) work steps 3 to 7 then repeat steps 5 to 7 for each block to the end.
Step 9: Continue working step 8 until the piece is as wide as you want it to be, turning at the end of each row.
And that is how you increase in corner to corner crochet.
To decrease is similar,
Step 1: Either slip stitch across the trebles of the last block worked and into the chain space, or (as we have done here) join in the new colour at the top of the chain on the block below.
Step 2: Chain 3.
Step 3: Work 3 trebles around the chain from the block below.
Step 4: Slip stitch into top of the chain from the next block
Step 5: Repeat steps 2-4 for each block to the last one, do not work into the chain of the last block, stop, fasten off the colour and turn the work over.
Step 6: Work steps 1 to 5 until you create a row with only one block in it.
If you fancy giving it a go we have two shawls that use the technique or a slightly modified version.
Deep Realm Scarf from Everyday Wearables
and Abberley Shawl from Raw which uses the technique along side a notion of open blocks to create a corner to corner inspired lace.
This tutorial was originally written by Joanne and published in love crochet magazine. It is republished with permission.
]]>Look for patterns that have these features when planning your stash busting.
Small projects
Mitts, headbands, baby clothes all use surprisingly small amounts of yarn.
Stripes
The classic. Most patterns, whether they are designed for stripes or not can be adjusted easily by just switching yarns every few rows. If you have different sections (like a back and a front) you might want to do a little planning to make it look intentional.
Remember, stripes doesn't have to be just rows of horizontal stitches, they could be spike stitches or raised stitches to break the colours up a little. Or choose ripple patterns that move the fabric around.
Fades and Ombres
Really these are just a special case of striping but can be an amazing way to use up yarn. Gather together all the yarns you have in a particular colour way and order them from dark to light or through the different shades of them for example moving from red purples to blue purples. You can even pick two colours and move from one to the other. This will work especially well if you always find yourself always buying the same colours - you know who you are!
Colourwork and intarsia
Whether you are stranding yarn or inserting sections into your work, these colourwork techniques can be great for using up part skeins. Just make sure you will have enough to finish the picture properly!
Motifs and Modular
The ultimate scrap buster, you don't even need enough to finish a whole row. Pick motifs that include stripes to use up your shortest odds and ends.
Want to know more?
This tutorial is an extract from our online course Use it Up, a complete guide to working with yarn you already have.
Or you can buy the pattern bundle that accompanies the course and features all the patterns shown in this article and more
]]>
In crochet you usually have one stitch on the hook at a time. For most stitches this will be two or three loops but even with the taller stitches or textured stitches like bobbles it's unlikely to be more than ten. This means the shaft of the hook doesn't need to be very long to accommodate the loops and there is plenty of room on the hook for a handle, whether that be a flattened or widened section or perhaps an ergonomic grip.
With Tunisian Crochet you normally have all the stitches of the row or round on the hook at one time, this means that the hook needs to be long enough to hold all the stitches. So Tunisian crochet hooks look like a knitting needle with crochet hook end.
With standard crochet hooks the choice is normally personal and to do with how you like to hold the hook and work, in Tunisian Crochet different styles of hook can be used for different types of patterns.
One hook or two?
Some Tunisian crochet hooks have hooks at one end and a stopper at the other. Some have hooks at both ends. Which you need depends on the project. Some styles of Tunisian crochet, including working very long rows or working in the rounds mean you always work in the same direction rather than back and forth on the rows so you will need the extra hook on the end to work the return pass in the same direction as your forward pass. As the hook will act as a stopper you can use double ended hooks for projects that don't require it too.
Straight or corded?
Like knitting, you have the choice of straight or flexible cords for holding the stitches. Which you choose will depend on personal preference and the project you are undertaking. Longer rows will need more room to hold the stitches so you may find a straight needle doesn't have enough space, cords can be different lengths to accommodate even the largest of projects.
Wood, metal or plastic?
As with knitting needles and hooks you will find that hooks come in a choice of materials: metal, plastic and wood being the main ones. The material you choose will be entirely down to personal preference.
The shape of the hook
As with standard hooks, there is quite a variety in the way the point, lip and neck are shaped between brands. This will be a personal preference.
How do I know what I prefer?
To save expensive mistakes you can do a little research with your normal crochet hooks if you have a little collection. Just because you like a particular style or material of hook for crochet doesn't mean you will enjoy it for Tunisian crochet because they require different actions. But you can still use the hooks to test it out by working small sections of Tunisian crochet, short enough to fit on the shaft, to see what shape you prefer.
Want to learn more? Why not join us in class!? Our course, Tunisian Crochet: Basics and Beyond, is an exploration of Tunisian Crochet techniques that takes you from first stitches through to following charts and patterns to create some gorgeous samples that build into a colourful cowl.
If you are ready to give Tunisian Crochet a try here are our selection of patterns and books that contain at least one Tunisian Crochet pattern
]]>
Here are my top tips for getting your crochet fix on even the hottest days:
1/ Pick your time
Early morning and last thing at night will be cooler times to get a few rows done.
2/ Pick your spot
Obviously a robust fan is not the thing unless you want to chase yarn scraps around, perhaps a shady are or somewhere with a little draft (or aircon if you must) My hammock is my go-to shady spot for a cool, quiet contemplative crochet session.
3/ Pick your project
Now is not the time for big blankets or sweaters, choose smaller items like motifs, socks, shawlettes, hats or tees. Something you are motivated to finish is also a good bet - like our summer mystery crochet a-longs!
4/Pick your yarn
The coolest fibres to work in the summer are smooth and natural. There's something about warm hands that can make wool feel itchier though, so if you are finding that then try some plant based fibres such as cotton, linen or hemp. Bamboos, silks and tencels feel deliciously cool.
Avoid anything that is going to felt easily (like loosely spun wools) as sweaty hands and the action of making could felt it as you work.
All of these lessons are hard won and I never end up sticking to them. I'm normally making or modelling the very warmest of items to get ready for the autumn winter releases! This photo shoot was taken on the hottest day of the year and out of shot I am wearing flip flops and shorts!
What is Mohair?
Mohair is a fibre taken from Angora goats. The Angora Goat has been bred to have long curly locks and the goats are sheared once or twice a year like sheep.
Advantages
Disadvantages
My top tips for working with Mohair:
Hand wind that ball!
If your mohair comes in a skein then you'll need to wind it into a ball. After many a fail over the years, I now always hand wind the ball (you can find a tutorial here) While swifts and winders make the job quicker, I find that the stickiness of the yarn means they fail too often and you end up in a tangle and lose all that time saving.
Go slow
And the same go slow advice holds out for while you are working. Because the yarn doesn't like being ripped back make sure you slow down enough to get the stitches right first time
Check for mistakes regularly
Keeping a count and visually checking for mistakes while you work means that you'll spot it before you have gone too far and have less to have to rip back.
If you do have to rip back
Pull very gently holding the yarn close the stitch and wiggle it slightly as you pull. Wind the yarn back up into the ball frequently to avoid the unravelled yarn getting tangled on itself.
Freeze it!
If you do have to rip out a large amount or you find you have a big tangle then you can try popping the project in a zip lock freezer bag and freezing it for an hour or two. Freezing the fibres closes the culticles so they don't catch on each other so much.
Look for blends or tighter spins
All of this tangling is because the classic mohair yarn is loosely spun around a core with the ends left free. Choosing a boucle spun mohair and/or one that is blended with another fibre can give you the benefits of mohair without the tangles.
Want to know more about Mohair?
A longer and fuller article is available in the Hub. Find out more about our member site here.
1/ Is it something you'll wear?
I tend to look first at the style. Is it a shape and style that you would normally pick up in a high street shop? Think about what you normally feel suits you when choosing the design. If its a sweater based on a current trend that’s perhaps a new shape you haven’t tried before consider trying a similar shape on in a store before committing to making the pattern. Having a similar favourite item to compare to helps as you can base some of your measurement decisions on it too.
For me, a lot of the decision comes from the yoke style (pictured above) and whether they are what I want from that style. The way the shoulders are constructed tends to make a big difference to the fit. For example raglan styles tend to be seen on sportier fits (think baseball tops with the contrast colour shoulders) because their constructions mean they are less restrictive around the shoulder joint. A set-in sleeve gives a classically tailored look and reduced bulk at the underarm. A drop shoulder is a classic comfort fit style. Circular yokes have no seaming at all in the yoke or shoulder area creating a smooth silhouette. Take a look at styles you like to wear from your wardrobe. You’ve probably barely considered how the shoulder is constructed before.
2/ Is the pattern good?
Next up, once I’ve established that I like and would wear the style I need to find out if I trust the designer. Not all patterns are created equally but a little homework should help you check, ideally before you buy, but at least before you launch in and spend a lot of money on yarn and time on the pattern.
Does the pattern look like its well thought through? Can you see all features of the fit from the photos? Does it look like the sweater fits the model well or are there elements like a drooping neckline that would annoy you? Unfortunately a lot of crochet patterns are based on ease of writing or making not on good fit, that’s particularly true of many that use motifs.
3/ Is it something you can make?
Next use the pattern listing to check whether it’s suitable for you. Does the size range include your size? Do you have some or all of the skills needed to make it (a good pattern should list these upfront so you can make a judgement as beginner/intermediate/advanced on its own is a bit too subjective.) If you don’t already have the skills are you willing to learn them?
What’s the cost of the suggested yarn and how many balls will your size need? If that’s out of your price range do you think you can find and afford an alternative?
If you’ve been able to answer all these questions then you’ve found the pattern for you!
You can begin your search here with our collection of trusted and true size-inclusive garment patterns
]]>
Very few people relish the task of weaving in ends at the end of a crochet project. Each project will have at least two yarn ends to deal with and many will have considerably more. A motif based blanket project in multiple colours can easily have hundreds of ends to weave in.
I shared the traditional way to weave in ends in this tutorial - which you will still need for some ends that can't be hidden this way. You may also find this tutorial on changing yarns a useful primer to this tutorial.
Luckily, in crochet, there are ways to weave in as you go and I will share the two main methods here.
Method 1: holding two yarns together.
This method works best when changing yarns of the same colour, for example when you finish one ball and move to the next. I've shown it here changing colour to show how it works but I wouldn't recommend it for this use unless you want a marled look.
Step 1: work until you are ready to change yarns
Step 2: Hold both yarns together and make the stitch with both strands
Step 3: work with both yarns held together for a few stitches - the more stitches the more secure the yarns will be
Step 4: continue in just the new yarn. You can trim the yarn ends close to the work now.
This method is good because it is very secure without any knots and you can adjust the length of time the yarn is held double based on how slippery the yarn is. It works really well in lacey patterns where weaving in can be very hard. It will leave a slightly thickened area which can be visible depending on the design and yarn. You can hide this in some patterns, for example bobbles and puff stitches hide this technique beautifully.
Method 2: Working over the ends
This second method is suitable whether you are changing colour or not. It doesn't work well in more open patterns so save it for when you are doing more solid rows or rounds.
Step 1: Change yarns by dropping the old yarn and pulling through a loop in the new yarn. (you can find a photo tutorial for this here) This method isn't as secure as the first method so I normally tie off the yarn with a flat knot (something like a reef knot will do, it's not important, just try and avoid anything that creates a big hard bump) If the yarn is a stickier wool I often don't bother.
Step 2: Hold both ends (the end of the old yarn and the start of the new) along the top of the stitches on the round or row where you will be working
Step 3: by keeping the working yarn at the back behind the strands (as shown in the picture above) and working into the stitches as normal, the strands will become trapped inside the row of stitches. You can vary how many stitches you work over the yarn ends depending on how slippy the yarn is then trim the yarn ends close afterwards.
This method also works well at the start of a motif.
Although I wouldn't do it with an unsecured magic loop. I use it when working into a chain ring. If a magic loop is called for, I replace it with chain 2 working into the first chain, the slip knot secures the start so I can work over the yarn end easily.
]]>
1. Thread your tail onto a tapestry needle working through the stitches, sew your tail through a few stitches.
2. It’s important to do this a few times in different directions to ensure the tail is secure and won’t unravel.
3. Snip the yarn close to where it emerges
How neatly you need to do this will depend on whether the project has an obvious wrong and right side. For instance, ends on a jumper you don't need to be too neat but for a scarf, which has both sides on show, you'd want to try and make it as invisible as possible.
How thoroughly you do this depends on how slippery your yarn in. The more slippery, the more passes you should make to stop it unravelling and you may also want to fasten a knot where yarns are changed.
If you have lots of yarn ends you can really speed up the process with a latch hook needle, not having to thread the needle with each end can be a big time saver, especially if your light, sight or fine motor control are less than perfect.
If you'd like to know how to avoid weaving in, then you might enjoy this post.
This tutorial is an adapted extract from our book The Learn to Crochet Project which takes you step by step from picking up your hook for the first time to working lace charts in four beautiful wearable projects.
]]>
There aren't any hard and fast rules about how and where to place you hook when crocheting into the row ends. And, other than where you are placing your hook, the stitches are made in exactly the same way. So its not really too tricky to master.
Recognising what a row end looks like is the easiest way to start. Obviously each stitch will look a little different so here are some marked examples of the different stitches with each row end marked with an arrow.
I find the shorter stitches harder to identify the row ends but conversely much easier to actually work into.
Here's what a piece looks like when picked up into the row ends.
The above is worked into rows of double crochet in the back loops only at a rate of one stitch (a double crochet/US single crochet) per row end.
There's no right or wrong place to put your hook as you work but you will get a neater effect if you choose the same place every time, so look carefully at the stitch as you place it and think about which strands you are going under or over. And remember, the more strands you go over the more firm the join will be, if you want a looser more flexible join go closer to the edge.
Often in my patterns I create a rib of half treble in the back loops as this looks like a knitted rib. When I instruct you to pick up stitches I'll often tell you to put the stitch or stitches into the row end that looks like a knit stitch or a "V". The photo below shows where these are.
The number of stitches you pick up per row end will probably be set in the pattern but if it isn't and you want to work so that the fabric lays flat you can use this rough reckoner - put the same number of stitches into the row end as the number in the turning chain..
]]>
The basic change
At its most basic changing yarns is just picking up a new one and using that instead of the old one. This technique works best to change colour at the start of a new row or change balls or the same colour at any time.
Simply let go of the old ball and pick up the end of the new yarn and draw that through the loop on the hook. In this example, above, I pulled the yarn through the loop on the hook at the end of the row and this created a one chain turning chain in the new colour.
You can know cut the original yarn ball leaving a short tail. Make sure you also leave a short tail of the new colour as you pull the loop through.
Note with this method the join hasn't been secured, both ends are loose. Unless you are using very slippy yarn, this will be strong enough while you work but when you have finished you will need to tie off each end and weave it in to avoid the risk of your work unravelling over time.
The mid row colour change
In the middle of a row, round or at any point in a spiral, if you want to change colour, it's important exactly when you pick up the new yarn. You want to do it in the final pull through of the stitch before the colour change. This is because the top of the stitch is formed by this loop.
Drop the old yarn and pull the next colour through as the final step of the last stitch
Continue in the new colour.
You can see above that if you don't do this then you'll have a stitch with the top and the post being different colours.
Standing start
A slightly more advanced way to change colour is the standing stitch. This works best at the start of a row or round and has the advantages of meaning you don't need a turning chain and your ends are already secured.
Start with the previous colour fastened off and a slip knot of the new colour on your hook.
Yarn over if your stitch requires it (I have in the photo above as if to work a treble (US double crochet) and insert your hook into the first stitch.
Make your stitch as normal.
A note on ends
Each time you change yarn you will have two ends that you will need to deal with. In the first two of these methods they are unsecured and need fastening before weaving in. On the third they are already fastened and just need weaving in.
You may enjoy this tutorial about weaving in ends and this one about avoiding weaving in ends.
]]>
Working into the other side of the foundation chain is common in modular and seamless crochet as it allows you to join and work in the other direction without having to sew pieces together. It can also be used for starting oval or rectangular pieces in the round, and often for the toes in toe up socks.
Once you've worked into the foundation chain once it will look like this. The arrows show each of the chains where you will work when you work into the other side.
To work into the other side of the foundation chain simply attach your yarn at the start of the row
Insert your hook exactly as you would for working into a chain.
Note that depending how you worked into your foundation chain you may have one strand, like I do, or two to put your hook under.
Then work along the row as instructed.
Sometimes the instruction to work into the other side of the foundation chain comes in the middle of the first round. This is the same principle as before
Work to the end of the chain.
You'll normally work multiple stitches into the final chain to allow there to be enough fabric created to move the piece around, as you work these stitches rotate the work in your hands
Continue to rotate, then work into the other side of the chain as directed.
]]>It may be that you cannot find or afford the yarn the pattern suggests, or it doesn’t come in a colour you like. It may be discontinued. Maybe you have an allergy or are vegan. There are many reasons why you might not want to work in the yarn the designer has specified but if you want the garment to look and move the same as the designer intended then you will need to carefully consider the replacement you use to make sure that it has similar qualities. There are three main things to focus on:
If you are following a pattern that needs to fit or drape, it is essential that you match the yarn weight or you won’t be able to match the tension of the pattern. Well that’s not strictly true but you won’t be able to create a fabric that looks like the fabric shown AND meets gauge.
When I say yarn weight I should clarify. This is not whether it comes in a 50g ball or a 100g hank. It’s to do with the thickness of the yarn itself. So we have all these different yarn categories. DK, worsted, 4ply, sport weight, chunky etc etc. This is made a little trickier by region as some yarn weights are more common than others in various parts of the world and the same weight is called different things. You can find out more about this in this post.
Yarn can be made from many different things. In fact this is why we generally call it yarn not wool; wool refers to the fibre (from a sheep) even though it has often been used in the past to mean all yarns.
Different fibres behave in different ways so if you want your project to look like the one pictured in the pattern you need to choose a similar fibre content. Be very wary of swapping a wool yarn for a cotton one for instance as they behave in a completely different way.
If you want to change from a natural fibre to a man-made one, there are a range of synthetic fibres created that behave like the natural fibres and vice versa
3/The way the yarn is spun
Many yarns are made up of two or three strands which are wound together, these are called plied yarns. Some yarns are made from a single strand of yarn, this is known as roving or singles yarns. Some yarns are made from chaining singles of finer wool. Yarns can be spun with the fibres combed to be aligned (worsted spun) or not (woolen spun).
All of these yarns will behave slightly differently from one another so its a good idea to stick to the something that is spun in a similar way or swatch very carefully if you deviate. You’ll often see designers mention the way the yarn is spun as a quality to look out for they may mention bounce or drape in this. Bouncy yarns can be defined as rounded to look at and if you held a short length of the yarn in your hand it would stand more upright, a drapey yarn may be slightly flatter in profile and would collapse downwards if you held a short length in your hand.
Your local yarn shop will likely be able to recommend alternative yarns in your budget. Most stock yarns at a range of price points and are very keen to help you find the perfect yarn for your project. Get to know them, learn from their expertise and spend your money with them.
If I am buying online, there is one resource I find absolutely invaluable: www.yarnsub.com It has a large database of yarns with lots of detail. If you put in the yarn that the pattern uses it will tell you the weight, fibre and how it is spun and also suggest lots of alternative yarns and will rate them on suitability for substitution. You can filter these suggestions by fibre and price. Its honestly the most useful website and its completely free. The blog and her newsletter are utterly fascinating if you like yarn geekery too.
If you are lucky enough to be using hand-dyed yarns for garments then it is well worth knowing a little bit about the industry. Most indy dyers purchase their yarn blanks from the same one or two suppliers but give that yarn base their own name. If you look at the yarn labels you can see that they will often be exactly the same composition as another dyer. This makes both substitution and combining different yarns in one piece much easier once you know what to look for.
So I hope that gives you a little more confidence to try other yarns than listed in the pattern. A shockingly high number of makers will make the pattern in the exact yarn AND colour the designer did, but it is quite okay to make it your own.
]]>Because it's harder to plan when you don't know exactly what the pattern entails I wanted to provide some additional advice.
The MCAL will work well with anything from 4ply (fingering) yarn to DK (light worsted) weight yarn but the amounts you need and the size of the finished shawl will vary based on what you use.
I can (and will) give you suggested hook sizes and yardages for the different weights but the best way to work these out is by making a small swatch. Its very quick I promise. And then you'll need to do a little multiplication to work out the dimensions and the yarn amounts you will need.
When I say best I do mean it because not all yarns are created equal and I discovered that just in my swatching to create the rough guides. It turned out that the finished size of my DK swatch on a 6mm hook gave me the same blocked size as my sport weight yarn I used for the project did on a 4.5mm hook.
So here are the suggested hook sizes yardages and finished sizes for the swatches I made in different yarns but do read on and do your own calculations if you want to be a bit more accurate:
4ply (fingering) yarn:
Suggest a total of 1300m yarn (around 350g)
4mm hook
Finished size: 40cm/16in x 123cm/48in*
(Calculations based on swatch made in Vicki Brown Standard Sock (4ply, 75% superwash merino, 25% nylon. 100g/425m))
DK (light worsted) weight yarn:
Suggest a total of 1600m yarn (around 700g)
6mm hook
Finished size 56cm/22in x 168cm/66in
(Calculations based on swatch made in Coop Knits Socks Yeah! DK (DK, 75% superwash merino, 25% nylon, 112m/50g))
Sport weight yarn:
Suggest a total of 1200m yarn (around 400g)
6mm hook
Finished size 50cm/20in x 152cm/60in
(Calculations based on swatch made in Stolen Stitches, Nua Sport (sport, 60% merino, 20% yak, 20% linen, 140m/50g))
*this is a little short for a wrap so I will suggest a way in the pattern to extend this but you will need additional yarn to do this.
A caveat on yarn amounts:
You can probably get away with a fair bit less yarn than recommended if you are using up small amounts, working with lots of different colours and not worried about symmetry. These are hopefully generous estimates that will allow you to work in the colours you want without running out.
Calculating the sizing more accurately:
To swatch follow the instructions (in UK terminology) below:
Ch32.
Row 1: Starting in 2nd ch from the hook, 15dc, miss 1 ch, 1dc, place marker in the dc just made, dc to end. 30sts.
Row 2: Ch1, 1dc in BLO of each dc to marker, missed marked stitch and next stitch, 1dc in BLO next stitch, move marker to stitch just worked, 1dc in BLO of each st to end. 28sts
Rows 3-15: As Row 2. 2sts.
Wash and block the swatch and check that the fabric is soft and drapey enough to be a shawl. If it seems too stiff then go up a hook size.
Once you have a swatch you are happy with, measure across the diagonal. The width of the shawl will be 4 times the diagonal, the length will be 12 times the diagonal.
You can weight the swatch to work out how much yarn you will need. In practice it will be a fair bit more than 48 times the weight (even though the sizing would suggest this) I'd allow 60-100 times the weight of the swatch.
What colours will work well:
Think of a patchwork quilt, there really are no rules. The simple stitches and movement of the fabric allow you to really play with yarn if you want to.
Bold contrast, subtle changes, solid colours, speckles and variegated yarns will all work beautifully.
Dividing up the yarn in colours:
For the sample I made in Daughter of a Shepherd Ram Jam Sport (Sport weight, 100% wool, 169m/50g) I worked in 4 colours: A to D. A to C I had 100g of and D I had 50g of. I used 80g of A, 82g of B, 75g of C and 40g of D. This is because I will never create a kit that doesn't have at least 15% leeway to avoid people running out of yarn.
If you are working with scraps of yarn or minis you can rotate the colours as you see fit in the pattern, using a different colour for each instance if you want to, or keep one or two of the colours as set and mix it up among the others.
You may even choose not to change colour where I do sometimes and work in larger blocks, especially if working with a variegated or colour change yarn in a section.
The pattern is designed like a patchwork and you can work with amounts as small as 5g or so if you wish.
Mixing yarn types:
Provided the yarn swatches to the same measurements after blocking you can mix brands and fibres freely. If in doubt you can stop and block to assess after adding a yarn into the pattern. If unsure or you don't want to keep stopping then keep to a similar style of yarn in brand, fibre and spin type.
If you haven't already grabbed your copy of the pattern yet (or you want to read a little bit more about the MCAL first. You can do so here.
]]>
Unravelling can be caused by improperly secured ends. It often happens at the centre of motifs where a magic loop has turned out to not be so magic, but it can also happen where factory knots in the yarn were left and have come untied over time or wherever there is a yarn change. A nasty snag can cause a single strand of yarn to break and you will have the same type of problem. Caught early, all of these can be quickly repaired using the "Swiss" method. If the unravelling has been allowed to continue unchecked then a traditional darn or a section replacement might need to be undertaken.
The old maxim "A stitch in time saves nine" was never more applicable than with crochet repairs. Its far easier to repair a hole when its small before the piece starts to really unravel. Looking at the various techniques you'll see that "Swiss" darning is much quicker and less obvious to repair one or two stitches than a traditional darn and that uses less time and effort than replacement.
Ideally you will need a yarn that is the same weight as the original.
If you wish to hide the repair you will need to make sure you get as close to the original colour and fibre type as possible. If you made a swatch, and can find it, this can be unravelled to provide yarn for any repair. Organised crocheters make life easier for themselves in the future, every time!
I've called this technique "Swiss" with quote marks for a reason. Swiss darning in knitting is worked with a needle and yarn and follows the line of the knitted stitch. Its often used decoratively but also creates a reinforcement for thinning areas. As far as I can tell there isn't a tradition of following the line of the stitch in crochet so I'm borrowing the term from knitting. Taking a needle and thread the yarn is sewn and wrapped to imitate the crocheted stitch.
You can find my favourite darning needle here.
This technique is best employed when a strand has come unravelled and you can clearly see the line of where the yarn should go. Get in there quickly before it unravels further.
How to:
Step 1: Thread the yarn onto the needle and weave in through a few stitches before the unravelling section.
Step 2: Pass the needle along the path of where the stitch has unravelled. In this case it is through the strands of the stitch above, this would have been a chain but as it is hidden by the stitches above there is no need to recreate this.
Step 3: Rejoin the yarn to where the unravelling started/ stopped making sure you attach it to a solid stitch
Step 4: Weave in yarn to past the point of unravelling to strengthen the repair and fasten off.
As you can see, below, the finished repair is almost invisible even worked in a contrast yarn. With a matching yarn you would never know the original had been damaged.
]]>When I first started designing for crochet, there weren’t many, if any, designers using hand-dyed yarns. I thought at the time that it was probably because of the myth of crochet using so much more yarn (yeah, I said it! Myth!) and so big box brands were always pushed as being more economic for crocheters. One of the tenets of The Crochet Project, when we started, was to showcase hand-dyed yarns in our designs: why should knitters have all the fun! Since then, thankfully I’ve seen its use in crochet grow with more crocheters discovering the joy of hand-dyed yarns and more dyers realising its a growing market and showing crochet samples of their yarn.
Hand dyed yarn is a more expensive product than its mill spun counterparts because it is labour intensive to produce. So while the range of colour and effects is a pull, so is the cachet of making with a luxury item. The trickle down effect of this has been that some commercial producers have tried to recreate the effects in their mill-dyed ranges.
Different types of hand-dying
To help me discover more about how hand-dyed yarn is produced and what you can crochet with it I interviewed my good friend Vicki of Vicki Brown Designs. As a fellow crochet designer, I felt she would have an interesting take on using hand-dyed yarn for crochet too.
Vicki started dying in her small kitchen in Cheltenham for fun and for her own use with Kool Aid as a dye. A trip to Wonderwool festival resulted in the purchase of a small set of professional acid dyes and her experiments took off. She used the yarn she had created for one of her crochet designs and friends and colleagues (myself and Kat included) encouraged her to turn her hand to dyeing professionally. She began by launching a shawl club where she sent out a skein of yarn and accompanying pattern to subscribers each month. The business has since grown and she has moved into a studio in town.
I asked Vicki if being a crocheter affected her dyeing. “It definitely did in the beginning when I was dyeing yarn especially for crochet patterns, I would have a very specific idea in my head of what I wanted and try to recreate that on the yarn. Sometimes it still does and sometimes I like the challenge of finding a pattern for the yarn rather than a yarn for the pattern.”
There are lots of different categories of dyeing but three of the most popular are semi-solid, variegated and speckled.
Semi-solid yarns are tonal, they use the same colour but the hand dying process means that there are different amounts of uptake in colour across the yarn base giving a range of depths of shade and tone. Vicki describes these are the least time consuming to dye. “I will simply submerge the yarn in a cold bath of dye, leave it to soak - usually overnight then the next day heat it up with some citric acid to set the dye in place, when the yarn has absorbed all the dye it's done.”
Variegated yarns have multiple colours in short lengths. There can be anything from two colours up and they may be complementary or clashing. Some dyers will allow the dyes to blend where they meet to create a yarn that smoothly transitions from one colour to the next, while others like to keep the colours separate to create a bold visual splash in the work. Vicki described her process for me. “I use big old preserving pans for my dyeing and sometimes fish kettles. Both of these work really well for me for variegated yarns. I lay the yarn out in shallow hot water, with the citric acid already added so that the dye takes quickly to the yarn, then I carefully add the different dyes to different areas of the yarn. Because the yarn is hot, the dyes absorb really quickly so you don't get too much bleeding and muddling of colours”
Speckled yarns can be added to a plain yarn, or over a semi solid or a variegated yarn. Little spots of colour are added to the yarn. This is the trickiest and most time consuming of the three according to Vicki “I have a few different techniques depending on what kind of look I'm going for. My favourite is to heat the yarn first in a base colour and citric acid, until it's really really hot! Then I remove the yarn from the water - squeeze out as much water as I can, lay it out on a surface, then sprinkle the powdered dye directly on to the yarn, whilst it's still really hot (it's a messy and hot process). Then after around 20 minutes I rinse it with cold water to remove any dye that didn't set in place. Then I heat the yarn one last time to make sure all the dye is set.
The process of hand dyeing yarn is a mixture of both art and science and it creates a product where no two skeins are exactly alike. Side note: this is why if you are making a larger piece using hand-dyed yarns you should alternate your skeins every few rows rather than finishing one skein and moving to the next. As Vicki says, ”You can create so many wonderfully colourful yarns that are real one of a kind, even when you're following the same recipes and using the same techniques. I really love using these types of yarns because you get a little surprise in every stitch.”
Crocheting with hand-dyed yarn
It can be tricky to understand how a skein of hand dyed yarn will look once its worked up. Most dyers, if they show a sample show it in knitted stocking stitch. Each individual knit stitch uses less yarn than a crochet stitch and crochet stitches introduce more twist so the yarn moves through the stitch in a different way. This means that knitting and crochet make the hand-dyed yarn look different. This especially applies to variegated and speckled yarns.
As a designer, I find that I can use a semi solid happily in any design and the subtle variations in tone will add depth and interest to the work. I find patterns that use speckles and variegation, especially bold clashes harder to incorporate and prefer to design specifically for them. I want to look for stitches and techniques that show the yarn off to its best. I wanted to share with you some of the stitches that I think work well.
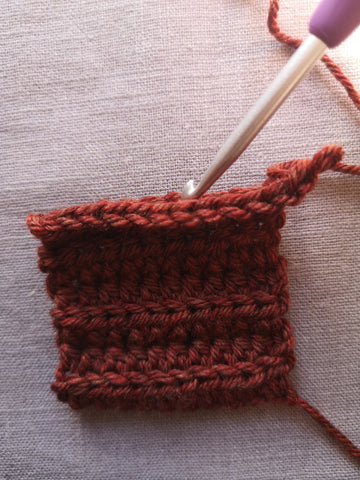
One of the main things I look for in a stitch to use with hand-dyed yarns is something that creates an untwisted section in the patter. One of the very simplest ways of doing this is working in the back loop only of a stitch so the front loop remains uncovered to create a straight section of yarn. Half trebles are particularly effecting as they have a horizonal bar on the wrong side which creates another float. I used this to good effect in the Fronds Shawl
Puff stitches and clusters, particularly those based on a half treble (so they are lots of loops you pull through on the hoop) are great at creating lots of floats in one place that can really show off the colours in certain yarns. Popcorns, bullion stitches and bead stitch would all fall in this category too.
Spike stitches create beautiful long floats and when laid over a solid or semi-solid background add a real pop. The depth of the spike can easily be customised to the length of the colour sections in the yarn.
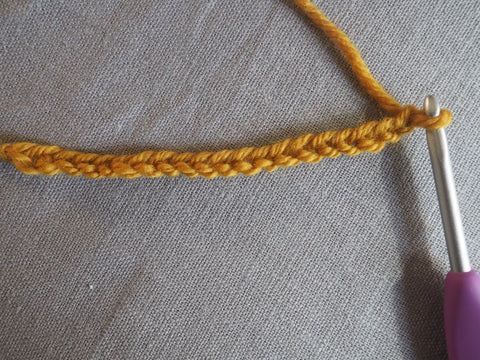
Blocks of colour all appearing in the same place is known as pooling and I like to soften the edges of any pooling by using stitch patterns that create simple movement. One of the best ways to do this is by working alternating stitches of different heights. This was the technique I used in the Humbug Scarf, alternating half trebles and double crochet to break up the row height. The half trebles created a float and the differing row heights helped to break up blocks of colour.
There’s something rather nice about the way a tall stitch spreads the colour even though it is twisted, double trebles, treble trebles and even quadruple trebles look great, especially with speckles. In the Stitcher’s Rhapsody Shawl I’ve combined a tall stitch with a raised stitch that forces the top of the stitch over, creating floats of colour too.
Overall I tend to avoid lace patterns in variegated yarns as I think the lace patterns compete with the colour too much to give a pleasing result and I avoid large blocks of solid stitches because I don’t think they work to enhance the yarn, although they do look perfectly nice.
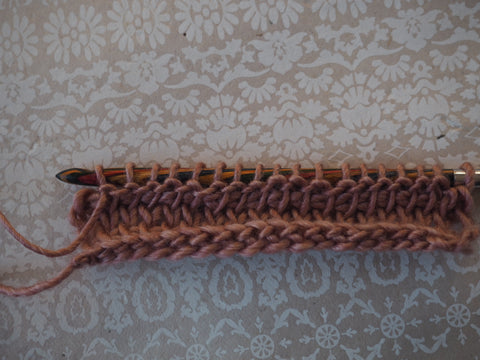
Tunisian stitches are something I tend to ignore somewhat in my work as I don’t enjoy working Tunisian crochet as much. The Tunisian knit stitch mimics stocking stitch so works brilliantly with hand-dyed yarns, although you would be pushed to find a more yarn hungry stitch so it may not be economic. Tunisian simple stitch gives lovely little floats of colour,. You could also try working it in two colours, with a more solid colour, alternating the colour of the first pass and return pass. If, like me you don’t enjoy Tunisian crochet, you could use linked stitches which are exactly like a small section of Tunisian simple stitch in your piece, but no change of hook is required.
It’s often noted by knitters and crocheters alike that hand-dyed yarns often tell you what they’d like to become. Or more accurately, don’t look at all how you’d expect sometimes and aren’t pleasing in certain patterns. But when pattern and yarn align, that is a true joy. The key to it is, take a little of this knowledge and apply it, try it out and if the yarn doesn’t look good in the pattern, take it out and try a different yarn and pattern combination.
Here is a selection of our patterns that work exceptionally well with hand-dyed yarns for you to play with:
This article was originally published in Inside Crochet and is republished in adapted form with permission. With thanks to Vicki Brown for answering the questions and supplying the yarn for the experiments and shawl. You can find Vicki’s yarn at www.vickibrowndesigns.com
]]>Working into chains has to be my least favourite part of crochet and the longer the chain the more troublesome I find it. Normally when designing I avoid creating designs that need really long chains to start off, but sometimes just sometimes the design is worth the pain. And here are some tips to help you cope with your foundation chain whether its 50 or 500 chains long.
1/Work into the most obvious part of the chain.
Depending how you create your chain it can look different to other peoples. There are three possible places to work into a chain:
In the front of the chain, as pictured above, you can see if you peer closely that the chains have one strand on the top of the chain and two strands at the bottom as pictured. Your chain may vary depending how you hold and wrap your yarn. It may have two strands at the top and one below. The point is that you can clearly see the middle will be the easiest place to work. So whether that is two strands below or above choose that.
The above image shows the reverse of the chain, you can choose to work into these back bumps instead. This does give a very neat edging but I find it very difficult to work into them as mine tend to try and scrunch up as I work the previous one. So I avoid doing this at all costs. I know other crocheters find this the easiest place to work so do give it a try yourself.
But basically, as long as you stick to the same place every time it will look neat and tidy so make your life easy and choose the easiest one. You can always come back and edge it later by working into the other side of the foundation chain.
2/ As much as possible, try and work it in one go
A smooth chaining action produces the best chains so try to work as much as possible in one fluid motion to avoid twisted uneven chains.
3/ Tug it!
But for those that do get a bit twisty and uneven in places give it a snap. Its amazing how tugging on the chain a couple of times before working into it can make the chains more regular and easier to work with. Keep tugging each section as you work to even out those chains.
4/ Use stitch markers
Placing stitch markers every 10 or 50 chains can really help you keep count. There is nothing worse than being mid chain and getting interrupted, being able to count just from the last marker can be a life saver
5/ Chain a few extra
Chains are pretty easy to unpick and weave in at the end but almost impossible to extend. When I'm working a long chain I'll often work some extra chains just in case I manage to miscount or any chains got so mangled I couldn't work into them.
6/ Consider swapping to a chainless foundation
If the first row or round of the pattern is just made of a single stitch you can work a chainless foundation row instead. You will need to consider if its appropriate for your purpose as the chainless foundation will have more stretch than a foundation chain with a row of stitches worked into it. You can find a tutorial for chainless foundation rows here.
]]>1/ Mark a stitch in the pattern
The standard usage! You get told to place a marker so you carefully slip it into the top of the stitch. I love using marker placement in my patterns as it is such an easy way to direct the crocheter to work and often simplifies reading/writing multiple sizes a lot.
2/Mark right or wrong side of the work
Crochet can look really similar on right and wrong sides, a lot of the fabrics are reversible but if you are working in pattern or shaping then you'll probably need to know which is designated as the right side. I always pop a marker on the right side of the work so I can correctly identify it quickly and easily.
3/Mark where your increase or decrease rows are
Often when shaping, a pattern will have you increase or decrease every so many rows, like every 8th or every 12th. I pop a stitch marker into the row I last increased or decreased in to make counting the number of rows I've worked since much easier.
4/Help you count chains
If I am making a long chain I'll often pop a stitch marker in every 50 chains. It saves me having to count all over again when I lose count.
5/Keep your work from unravelling
Need to take the hook out? No problem, just pop a stitch marker in to the open loop to stop your work unravelling. In fact this can be safer than leaving the hook in if you are travelling or moving your project around as a stitch marker is less likely to slip out than the hook is.
6/ Plan placements including buttons and button holes
Before you get your hook out it can be easiest to place stitch markers to plan spacing on picking up stitches, start and finish points or buttons and button holes. To plan button placements just use the same number of stitch markers as you'd like buttons and you can then play around until the spacing is nice and even.
7/ pinning before joining.
Especially useful for small pieces like origami, I've even used it on full sweaters when I haven't had any pins to hand.
They certainly are useful little things aren't they!? The stitch markers featured are my absolute favourites, I've tried all sorts over the years and these are the only ones I have found that really stay in place and never snag the yarn.
You can find these stitch markers and other tried and tested notions in our notions shop.
]]>One of the most popular combinations is adding a strand of mohair to a plain yarn and working with them held together to create a soft fluffy halo but still creating a solid piece.
Holding yarns together can be a great way to use up yarns in your stash too. Perhaps you have lots of 4ply but are lusting after patterns that are using chunky yarn - you can combine them and create some really interesting colour effects at the same time.
Tattingstone Sweater uses two yarns held together
There are lots of patterns available that use yarns held together (and we have Cold Snap Cardigan and Tattingstone Sweater from Easy Everyday Wearables that use them) but can you replace yarns in any pattern you like? Short answer is yes you can!
The longer answer follows...
Some common yarn pairings
These should be taken with a little bit of a pinch of salt because not all yarns of the same weight are the same thickness with a heavy fingering yarn being interchangeable with a lighter sport weight yarn for instance. If there is variation in the single strand then that will be magnified when doubled.
A more detailed look
This all gets a bit easier to understand (and more accurate) when you look at wraps per inch (WPI)
WPI are measured by wrapping the yarn firmly and snuggly, but without overlapping or stretching around an object like a pencil and counting the number of strands to one inch. This can help determine the weight of the yarn. Sources online vary slightly so I have chosen to go with the Craft Yarn Council's WPI range for each yarn weight.
So you can see that there is a bit of a range here but that two strands of a laceweight of 32 WPI would have 16 WPI (half) giving you a yarn in the 4ply/fingering range.
Or a 4ply of 20 WPI when held double will give you a WPI of 10 (half) creating a DK weight yarn.
It gets more complicated when the yarns held together aren't of equal weight or you have more than two but you can calculate it either by wrapping it yourself or by adding fractions.
So back to this example of the 4ply yarn you are actually adding 1/20 to 1/20 which gives you 2/20 which you can rationalise back to 1/10 so 10WPI.
So if I add a lace that is 40 WPI to a 4ply that is 20 WPI I'd work it as
1/30 + 1/20 = 2/60 + 3/60 = 5/60 = 1/12 = 12 WPI
So the lace with the 4ply, in this case, made a sport weight equivalent.
A couple more things to note.
When you hold two or more yarns together to replace one yarn you will create a somewhat different effect. Because the yarns haven't been spun together you will tend to get more drape than you would in a spun yarn of the combined weight. And secondly, if you are working with different thicknesses of yarn then the thicker one will be the more dominant colour and texture in the piece.
Swatching is key!
I know I sound like a broken record throughout these tutorials but swatching is key to successfully substituting to yarns held together. The basic overview and the maths you can use give you a great idea of what might work but there are so many factors involved that you will only know what the fabric will be like when you swatch.
]]>
The yarn amount given in the pattern is for the unaltered pattern and each alteration you make will have an effect on the amount of yarn used. So for anything significant you will need to learn to calculate what that will be.
You will likely be working with averages as the amount of yarn used varies over the various stitch patterns: ribbing using more perhaps than the main stitch pattern.
Here is how to calculate how much yarn you will need
Prepare a large swatch in your main stitch pattern (you'll have done this to measure your tension anyway, surely!) Measure and weigh the swatch. You can now calculate the grams per cm2/in2 by multiplying the width of the swatch by the height of the swatch to get the area then dividing the weight by the area. We'll call this figure Y (for yarn of course!)
You can then calculate how much less/extra yarn you might need for any given change by calculating the area change and multiplying it by Y.
Examples
Let's take for example a swatch measuring 5in by 5in that weighs 5g. The area is 25 square inches.
Y = 5g/25 = 0.2
Say that you are making a sweater that measures 40in at the hip 4in longer.
You will be adding 40x4=160in2 to the basic pattern.
Multiply the additional area by Y = 160x0.2 = 32.
So you will need 32g of extra yarn.
Keeping Y the same let's take the example of modifying a sleeve to be tapered. The original sleeve is straight and measures 12in around and is 18in long.
Therefore, the original sleeve has an area of 12x18 = 216in2.
Your planned sleeve is 12in wide at the top and tapers evenly to 9in wide at the bottom. To calculate the area we take the average width (by adding the two together and then dividing by 2) and times it by the length.
Therefore the planned new sleeve has an average width of (12+9)/2=10.5
giving an area of 10.5x18=189in2.
Subtract the planned sleeve from the original sleeve to find the difference.
216-189=27 which we will then multiply by Y (27*0.2=5.4)
So you will use 5g less per sleeve so 10g less for the sweater assuming both sleeves are tapered.
Some helpful reminders of how to calculate areas
Rectangles and squares are height multiplied by width.
Tapered shapes are the height multiplied by the average width (and you can get the average by adding the maximum width and the minimum width and dividing by two.)
Triangles are half of the width times the height.
Circles are the radius times the radius times π (the radius is the measurement from the midpoint to the edge)
Using it with stitch counts
Of course, you could also get Y per stitch if you wanted by counting the stitches in the swatch then dividing the weight of the swatch by the number of stitches. You'd then be thinking about the total number of extra/removed stitches you were working in any alteration.
What about using it to design rather than alter?
Its exactly the same approach but you'll need to work out all the areas of the pieces in the design and multiply these by Y.
In fact this is how I calculate yarn amounts in patterns but I will normally use the sample to calculate Y.
Always round up!
When working out yarn requirements don't forget to round up. For example, if a change needed an additional 55g and you are using 50g balls you would need two extra balls. And always err on the side of more yarn. Its very easy to find a stashbusting pattern, much harder to track down an extra ball in the right dye lot.
Sock yarn needs to be really hard wearing. Its probably the biggest challenge that a yarn will face. The hope is that you'll want to wear your socks a lot and walk or move in them. As you move they will rub against your feet and your shoes or the ground so the yarn has to be pretty sturdy in order to take that punishment. Now luckily your feet aren't the most delicate part of your body, so unless you have an allergy you can probably cope with a sturdier yarn there than you might want around your neck, where you want softness and gentleness against the delicate skin.
The other thing a sock yarn needs to be is elastic. The stretch to fit is so important in handmade socks and, because crochet is intrinsically slightly less stretchy than knitting, the yarn's natural elasticity is really important.
For me, a wool blend is the obvious answer. Wool is a hard wearing and an elastic fibre that can stretch and return to shape. Crucially for socks, wool is breathable and naturally wicks moisture away. Wool repels odour and is fairly self-cleaning so wool socks don't need washing very often, they can just be aired between wears (I promise). Remember, washing as little as possible helps your socks last longer as the washing process contributes to the wear and tear too.
But wools are not created equal. A wool from a sheep that has a long staple length (the length of each individual hair) will be harder wearing than one that has a shorter one and the tighter it is spun, generally the more hard wearing it is. Hairs that poke out of the yarn tend to be what can make it itchy and longer staple lengths are prone to do this. Tighter spins prevent this.
Sock yarns are typically spun with a little nylon in them to make them even harder wearing. And I think, depending on your views on plastics these are a good choice as the nylon will make the sock last longer.
If you are vegan or have a wool allergy, a man-made blend is probably going to be your best bet. A cotton blend may be suitable but bear in mind that cotton doesn't have as much natural stretch as wool does although it will be strong.
And what about weight? The thickness of the yarn you need to be will obviously be determined by the pattern (you want to match tension carefully in socks) but which patterns should you go for. In my experience a 4ply or fingering weight yarn will make a sturdy crochet sock that fits into most shoes. It won't be as fine as a knitted 4ply sock due to the nature of crochet. Any heavier yarns such as DK, aran or worsted, will be more suitable as boot socks or slippers.
Want to learn more? Our Crochet Socks class takes you through every step of the process from selecting yarn and pattern through cuffs, heels and toes to caring for your finished socks.
Ready to pick a pattern? Choose from our selection
]]>
]]>
These three swatches were all made with the same crochet stitch, the same yarn, the same hook, same number of rows and have the same stitch gauge. So why are they such different heights? Its to do with the amount of yarn that is pulled through the stitch and the thing that seems to control that most is the tension you place on the yarn and the angle you hold your hook at. I've seen this described as three types of crocheter: yanker, rider or lifter. So I created these three swatches, one in each style to see how big the difference is.
The yanker pulls the yarn taut (yanking it tight) when pulling the yarn through the stitch. Their hook is likely to be held at almost 90° to the row to pull it through such a small loop. They have the shortest row height and often will find that they have way more rows to 10cm/4in than the tension requires. Yankers often have lots of yarn left over at the end of a pattern that's worked by number of rows rather than measured length.
All the loops on their hook are about the same size and they probably pull through at about a 45° angle to the row. This is the middle swatch and they are less likely to have trouble getting row gauge (however remember the designer maybe a yanker or a lifter and in which case they may)
The lifter pulls up a big loop when bringing the yarn through the stitch. The hook is likely to be held almost parallel to the work. This creates the tallest stitches of the lot so they may find that they have fewer rows per 10cm/4in than the tension information. Lifters often run out of yarn before the end of a pattern that's worked by number of rows rather than measured length.
Over 8 rows the yanker swatch measured 4.5cm, the rider is 5cm and the lifter is 6cm. That gives row gauges of 18 rows, 16 rows, and 13 rows per 10cm/4in respectively. That's quite a difference. Especially when you consider that they all have the same stitch tension. To put it into perspective if you made even quite a small shawl of 60 rows you'd have depth of 33cm, 37.5cm or 46cm, thats a big difference in shawl size!
It will also be quite noticeable in things that want to maintain a sense of proportion like amigurumi not looking how the designer intended at all. Or shawl shapes being squished or elongated.
Knowing about these three styles of crocheter can help you by identifying which you are and what you might need to do to get the right row tension for the pattern you are making.
I'm naturally a rider so I had to really concentrate hard to work as a yanker and a lifter but it was definitely possible to change the way I worked and it became easier as I did more rows. I think over a larger project I'd have to really concentrate not to slip back into my usual ways.
]]>As you know, the pattern relies on working two meshes at the same time. The yarn A mesh is always bigger than the yarn B mesh. You will only ever work into stitches of the same colour as the yarn you are currently working and you never work into the chain spaces.
Because we have so much going on the patterns are written slightly differently to one of my standard crochet patterns. The pattern is written with two sets of instructions for each row, one for each yarn colour. Which will look like this:
Row 3 (RS): Drop B to front.
A: Ch3 (does not count as a stitch), miss first st, trif, ch1, *trib, ch1; rep from * to last 3 sts, trif, ch1, 1tr in last tr, 1tr in t-ch, do not turn. 74sts
B: Ch3(does not count as a stitch), miss first st, *trib, ch1; rep from * to last st, trif in last tr, ch1, trif in t-ch, turn. 72sts
It starts with the placement for yarn B. Pay careful attention to which direction yarn B is dropped in before you start working yarn A row - it matters!
You will then pick up yarn A and work the instructions for yarn A
into the yarn A mesh. When you have finished, place a stitch marker in the loop that was on your hook and place the hook into yarn B and work the yarn B instructions into the yarn B mesh. After this place the stitch marker into the loop on your hook and turn the work and begin working the instruction for A on the next row. And so on.
To make the pattern as concise as possible we make the assumption that you are always only working into a stitch of the same colour in the row immediately below. All chain spaces are missed but we don't mention that each time.
The count (74sts/72sts in this example) at the end of the row is the stitch count of trebles (and sometimes including the turning chain but never the chain spaces) in that colour once the row is completed.
So lets give it a go with a simple sampler. Here is the pattern for those ready to dive in and below I will give a row by row tutorial and my top tips for getting it right
Simple Sample Pattern
Foundation Row: In yarn A, 21fdc, turn.
Row 1 (RS):
A: Ch1, *1dc, ch1, miss one st; rep from * to last st, 1dc in last st, do not turn. 11dc
B: Coming in from behind, attach yarn B in the first missed st at the start of the row, ch4 (counts as 1tr, ch1), working into the missed sts only, *trib, ch1; rep from * to last missed st, trib in last missed st, turn. 10tr
Row 2 (WS): Drop B to front
A: Ch4, *trib in dc, ch1, trif in dc, ch1; rep from * to last 2 sts, trib in dc, ch1, 1tr in last dc, do not turn. 11sts
B: Ch4, *trif, ch1; rep from * to last st, trif in t-ch, turn. 10sts
Row 3 (RS): Drop B to back.
A: Ch4 (counts as 1tr, ch1), *trib, ch1, trif, ch1; rep from * to last 2 sts, trib, ch1, 1tr in t-ch, do not turn. 11sts
B: Ch4, *trib, ch1; rep from * to last st, trib in t-ch, turn. 10sts
Row 4 (WS): Drop B to front
A: Ch4 (counts as 1tr, ch1), *trib, ch1, trif, ch1; rep from * to last 2 sts, trib, ch1, 1tr in t-ch, do not turn. 11sts
B: Ch4, *trif, ch1; rep from * to last st, trif in t-ch, turn. 10sts
Repeat Rows 3 and 4 for pattern, continuing until you have a square, or feel confident with the technique.
Let's break it down
So lets step through it a little bit slower. The foundation row and Row 1 were as we worked in the set-up so you can see those in more detail here.
After you have worked Row 2A your piece should look like this:
After row 2B it will look like this:
After Row 3A:
After 3B it will look like this:
Now onto Row 4. After the Row A it should look like this:
Now you've mastered the pattern reading! I'll leave you with my top tips for keeping things on track
Top Tips
And you are ready to put it into practice:
]]>
In this tutorial we are going to learn how to work the two main stitches you will use in interlocking crochet: trif and trib.
Important to know with both of these stitches
Trif
Trif stands for treble in front. So if you were to write it in US terminology it is dcif or double crochet in front.
How to:
Yarn over, place your hook in front of the mesh of the other colour and, working into the stitch below of the same colour, insert your hook from front to back through both strands of the stitch.
Exactly how the stitch is made depends slightly on the position of the mesh. On the right side a trif into yarn A mesh which will be forward will be just like making a normal stitch just ensuring that the yarn B mesh is clear of the working yarn and hook. But a trif into the yarn B mesh on the right side, the stitch will have to be pulled forward slightly through the mesh in front to ensure that you can make the stitch without wrapping the mesh in the stitch.
On the wrong side of the work the reverse will be the case because the yarn B mesh is forward and the yarn A mesh sits behind
This picture shows the yarn and hook placement for a trif where the mesh is to the rear.
This picture shows the hook and mesh placement for a trif where the mesh is to the front:
Trib
Trib stands for treble in back. So if you were to write it in US terminology it is dcib or double crochet in back
How to:
Yarn over, place your hook behind the mesh of the other colour and, working into the stitch below of the same colour, insert your hook from front to back through both strands of the stitch.
Exactly how the stitch is made depends slightly on the position of the mesh. On the right side a trib into yarn A mesh will need to be pulled out and backwards with your hook to ensure that you can make the stitch without wrapping the mesh in the stitch while a yarn B trib stitch will be worked like a normal stitch just making sure that the yarn A mesh is kept forward and out of the way.
On the wrong side of the work the reverse will be the case because the yarn B mesh is forward and the yarn A mesh sits behind
This picture shows the yarn and hook placement for a trib where the mesh is to the rear.
This picture shows the hook and mesh placement for a trib where the mesh is to the front:
Now you've learnt how to set up and the basic stitches you are ready to learn how to follow an interlocking pattern.
]]>
I finally took the plunge earlier this year and I am so glad I did, it's my new favourite technique and the possibilities are endless.
I'm hoping I can explain it to you in a way that doesn't put you off for years and gets you going right away! So this is the first of a series of tutorials and in this one we'll look at what Interlocking Crochet is and how to set up ready to work it.
So, what is interlocking crochet?
Interlocking crochet is a technique that creates a two sided, two colour pattern. It lends itself well to bold geometric patterns.
You may have come across filet crochet (I used a basic filet mesh to create the Direction of Travel shawl (which is then decorated with surface crochet)) In filet crochet trebles and chains are worked to create a mesh that has open and closed blocks to form a lace pattern.
The basic filet mesh uses only open blocks. Interlocking crochet is created by working two filet crochet meshes, one of each colour, at the same time.
The meshes are worked so that they are weave in and out of each other and this is what forms the patterns.
The mesh created in yarn A will be one block larger than the yarn B mesh so that they the stitches of one line up with the spaces of the other.
What are the advantages of interlocking crochet over mosiac crochet?
Interlocking crochet forms patterns that you could achieve using mosiac or stranded crochet techniques but I think it offers several advantages:
What skills do I need?
Interlocking crochet only uses the basic stitches - trebles (US double) and chain. You'll need to be able to do these and read a crochet pattern. then its just about mastering the art of working in front or behind the other colour mesh
What tools and materials do I need?
Interlocking crochet only uses standard crochet items. You'll need two colours of yarn, a hook of the right size and I highly recommend having a removable stitch marker to pop into the unused yarn loop each time you switch colours. This vastly reduces the risk of your work unravelling as you go.
Choosing a yarn
You want a yarn that will bloom slightly on blocking. Anything billed as good for cables will fit this requirement. Its very important that the two colours have a strong contrast so you can see the pattern clearly or they will fade into one another and I think it will work best if they are the same type of yarn so the contrast is only in colour not in texture.
Let's get started!
How to set up for interlocking crochet
Interlocking crochet normally starts with creating the first row of each mesh separately (as above) and then dealing with the edge later. When I first learnt to do the technique I found this very tricky to both understand and to not miss stitches as the two grids slid around so much before they were fully attached so I am very grateful to Pia Thadani of StitchesnScraps.com for sharing, and allowing me to use, this clever method of starting.
Step 1:
In yarn A, create a row of double crochet (US single crochet) by chaining and working into that chain or by working a chainless foundation row (as in this picture) as an example I've worked 21dc.
Turn your work.
Step 2:
Continuing in yarn A. Work as follows into the row of stitches (UK terms)
Ch1, *1dc, ch1, miss one st; rep from * to last st, 1dc, do not turn. 11dc
(and I'm really sorry but I thought I had photographed this but can't find it, you'll be able to see from the photo in the next step)
Take your hook out and pop the working loop onto a removable stitch marker to stop your work from unravelling while you work with yarn B.
Be sure not to turn your work.
Step 3:
Now we are going to take yarn B and work back along the stitches that were missed in step 2 but we are coming in from behind so you want to insert your hook into the first missed stitch with the first chain in front of the hook but otherwise its front to back as a normal crochet stitch would be.
then chain 4 in yarn B. This counts as 1tr and 1ch.
Step 4:
Using the same hook positioning, behind the chain and into the missed stitch, work a treble (US double) and chain 1.
(this photo shows the treble half complete to try and give an idea of stitch placement)
Step 5:
Repeat step 4 in each missed stitch across the row (don't do the chain 1 after the final stitch. You will now have 10 tr in yarn B.
And that's it, you are set up ready to learn how to work the stitches of interlocking crochet and discover how to read the patterns.
Find the rest of the tutorials for interlocking crochet here.
]]>Luckily there is another way. You can create your foundation chain and first row all in one if you know how. Genius!
The first row can be made in any stitch but this photo tutorial shows how to with the double crochet (US single crochet) then explains how to adapt it for the taller stitches.
How to work a foundation double crochet (fdc)
(US foundation single crochet (fsc))
1/ Chain 2
2/ Insert hook into 2nd ch from the hook, yarn over and pull up a loop through the chain. This action links the stitch.
3/ Yarn over and pull through the first loop on the hook. This creates the chain portion, hang on to this because you are going to need to know where it is in a moment.
4/ Yarn over again and pull through both loops on the hook. This creates the stitch. (notice how I am holding on the chain section in the photo)
5/ Insert your hook into the chain part of the last stitch, yarn over and pull up a loop. This links the stitch
6/ Yarn over and through one loop to create the chain. Again hold onto this because you need to know where it is.
7 /Yarn over and pull through both loops on the hook to create the stitch.
Repeat steps 5-7 until you have enough stitches in your foundation row.
I like to repeat to myself the following to remember where I am "once to link it, once to chain it, through everything to make the stitch"
Once you've mastered it in double crochet (US single crochet) you'll be ready to try it with all the stitches!
To adapt it for other stitches you'd adjust the chain you make in step 1 to be the usual turning chain for the stitch plus 1. You'd then yarn over (one or more times) before inserting your hook in step 2 and 5. Then steps 4 and 7 you'd make the stitch as you normally would, so for a half treble/ (US half double crochet) you'd pull through all three loops on the hook, and for a treble (US double crochet) you'd yarn over and pull through two loops twice, and so on.
You can pretty much substitute this technique in any time you are asked to create a chain with a row of stitches into it. Just be aware that lacey patterns might be quite tricky to start this way and sometimes in garments the foundation chain gives structure to a seam so think about that before substituting.
]]>]]>
Some yarn choices can look great together in the skein but when you start working the pattern you realise that they merge into one, especially when seen from a distance.
So I wanted to share with you one quick tip to avoid this.
Take a picture of the yarns, you'd like to use. And pop a greyscale filter on it.
You can see that even though these two colours (Aventurine and Carnelian*) look very different to one another they have a similar tone and this is very obvious in black and white.
Whereas although these colours (Lepidolite and Chryso*) are different tones and so would be a better choice for colourwork that pops.
Of course, you can use this tip in reverse if you want your yarn choices to harmonise, if you want to blend one to the other with stripes that fade then choose colours that look very similar to each other when you put a greyscale filter over them.
Of course I'd always recommend swatching to make sure you will get the result you want but this tip can help you narrow down your choices before you get to the swatching phase.
*yarns used are all Coop Knits, Socks Yeah! yarn (4ply)
]]>A well finished project with neatly woven in ends looks a million times better than one with dangling ends poking through.
Luckily, its a pretty simple task. All you need is a needle with a large enough eye for the yarn (called a tapestry needle) and a pair of small scissors to trim with.
If you have lots of ends, I highly recommend grabbing a cuppa and putting a good movie or podcast on to keep you entertained while you tackle them.
So here is how you do it.
How to:
1/Thread your yarn onto the needle and, on the wrong side of the work, push the needle through the top strands of several stitches. I always try and do this in an area where the colour is the same so that it will show less on the right side.
2/Pull the yarn through those stitches so that the yarn strand and the work lay flat.
3/ Bring the yarn strand back through several stitches in the opposite direction. This makes for a secure weave as going in two directions should stop it pulling out over time. If your yarn is very sticky, and by that I mean it wants to grab to itself and pulling out stitches is very difficult you can skip this step. If its a very slippery yarn you might want to repeat this step going back the opposite way again.
4. To cut the tail, pull slightly on it and snip it close to the stitches
(being careful not to actually cut the stitches) and the tail should
pull back and be hidden under the stitches when it relaxes back.
I absolutely love these needles for weaving in ends because you don't have to thread them.
This tutorial is based on the tutorial from The Learn to Crochet Project Book
]]>